Showing posts with label Tutorials. Show all posts

Wednesday, August 22, 2018

Angel Canvas Tutorial

Hi Friends, Today I'm sharing a canvas I created for my swap partner (RobandTim2) in this months mixed media swap at scrapbook.com.  This is the first time I've worked with paper clay, so I really enjoyed making this!  Lets have a closer look:
To create the frame, I took an 11x14 inch canvas and reversed it.  I used "Creative Paperclay" and Prima  IOD mold No. 1 to make the ornate detail.  Each wet molded piece was laid end to end, securing them to the frame with matte gel.   Shrinkage was patched with extra clay.
To make the wings I used a rolling pen and rolled out paper clay flat and carved out a pair of wings.  I embossed the wings with a rose embossing folder by just pressing it firmly into the wet clay wings.   I used Prima mold Nautical II to add flourishes to the wings    And I used the same mold to add the beaded trim around the dress.  
Before gluing anything down, I used some modeling clay and white acrylic paint and stenciled small crosses in the background.  Then I mixed some primary blue and black acrylic paint and splattered paint drops in the background.  Finely, I embellished each corner with 49th and Market Potpourri navy flowers and Prima white flowers. 

To finish the project off,  I rubbed Art Deco Gold Rush Metallic Luster paste all over the ornate frame and the beaded trim on the dress.  Attached the wings, bodice and flower work with matte gel medium.  To finish up, I created a complimentary card, wrapped the canvas and added a few goodies. 
There you have it friends!  Thanks for dropping by.  If you enjoyed this post, please "follow" this blog, share and/or subscribe!  Unite next time ... Big Hugs ~ Dawna

Tuesday, July 10, 2018

Steampunk Hot Air Balloon Tutorial

Today I'm sharing a Steampunk Hot Air Balloon that I created using a huge Edison Bulb, paper mache box, wooden BBQ skewers, chain, wooden cogs and wheels, fabric and ornate feet. 

This project really gave me a run for my money! I loved the idea of using the Edison bulb for the balloon and I wanted it to have an old world feel so I painted it in vintage red oxide, turquoise and gold. I variegated the red and gold and carried the green from top to bottom. Painted the basket (box) and used a stencil to add a touch of gold. 

Before I put the box together I placed wooden skewers in each corner and glued them in place so the bulb would rest evenly on the tips of the skewers. I used chain to drape around the bulb and attached wooden fans, gears, cogs (all covered with antique brass wax). Extra chain drapes below the balloon. 

I added coordinating fabric as flags on each corner. I put an eyelet in the flag tip and draped a charm chain in each corner. I haven't found the perfect charm to hang yet as most have been too big, but I'll keep looking to complete that finishing touch. 

If you enjoyed this post, please "Follow" and "Share" this blog to your social media.  Thanks for dropping by!  Until next time!  Hugs ~ Dawna

Thursday, August 31, 2017

Find Your Song, ... Nature Tag


Hi Friends,  Today I'm sharing a nature inspired tag I created for my friend Martica's birthday.  I don't make tags very often, but Martica loves them so I decided to give it a go.  The papers are from my stash of K and Company's classic Nature collection. 

I fussy cut the bird and nest, then popped them up for a little dimension. I used matting gel to add some Tim Holtz musical note tissue paper to the base of the tag.  Then I added a little random sewing and punched the edges to frame the tag.  To embellish, I added a Prima pink vine spray, some Wild Orchard roses, a few butterflies, some bling and lace trim.  Vintage seam binding slips though the back to create a bow tied hanger for the tag. 
Thanks for stopping by, I hope you found a little inspiration here.  If you enjoyed this post, please "Follow" and "Share" my blog with your friends.  Until next time, make it a happy day!  Hugs ~ Dawna

Sunday, May 1, 2016

Mica Pendent and Curiosity Tag

 
Hi Friends, Today I'm sharing a necklace I made for my swap pal, Tammi (aka Silver26ak) in a jewelry swap.  Tammi really loves fall colors and nature, so I decided to try my hand at using the Mica Flakes to create the pendent and present the necklace on a nature themed tag. I've never done jewelry before and I'm very new at making tags, so this was a really fun challenge for me. 
I used an Elizabeth Craft Designs die set called "Tag's and More" in "Leaves" to create the arched tag with inset leaves cut out.   The die also has several options for creating holes, corners and reinforcements.  I kept it simple with just the plain circles in orange and backed the leaf cut outs with green cardstock.  The pendent is a Prima bubble and Finnabair metal plate.  The metal leaf is from Tim Holtz Ideology metal collection called "Festive Foliage." The jute sheer ribbon necklace is available at any big box craft store. 

To create the pendent, I placed double sided tape onto the metal plate, sprinkled the flakes all over, then laid a piece of wax paper over the flakes to protect them.  I burnished (rubbed real well with a hard straight edge) the wax paper over flakes to safely secure them to the metal plate and dusted off any excess.  Last I sealed the flaked plate and bubble together using glossy accents.  I used a jewelry clasp to add the metal leaves and pendent to the sheer jute necklace, knotted each side so they would remain centered during wear, and viola'!  Your pendent is done!  Was that easy peasy or what? 

To decorate the tag, I chose the "Curiosity" sheet from Kaisercrafts "Curiosity" paper collection.  I used the Elisabeth Craft tag die mentioned above, then added a black script layer under that, then a third layer of orange to double frame the bird tag image.  I die cut a black doily then cut it in half and placed them between the cardstock layers, then taped the layers together.  I love the crowned bird image and wanted to feature that in the center and embellish the side and corner with Prima Filigree Flowers and Leaf dies.  The orange filigree flowers have a punched stamen with a  rhinestone center.  Notice I alternated the stamen and leaf colors for added interest. 
 
Lastly, I used the Spellbinders Stamp die for my sentiment label which reads "A Garden of Happy Wishes for You."  I added green tulle to the top of the tag, and was very happy how my first piece of jewelry and its presentation came out.  Here's one last look:

Well friends, that's it for me today.  If your interested, you can find a complete list of items I used here:

Thank you for dropping by today.  Your visits are very much appreciated and, as always, I'd love to hear from you!    If you enjoyed this pretty Mica Pendent and Curiosity Tag, please take a moment to join or follow my blog.  I hope you feel inspired to create something beautiful today.  Until next time, have a joyous day! ~ Dawna 

Saturday, April 30, 2016

Vintage Dress Form Tag

Hi Friends,  Today I'm sharing a Vintage Dress From Tag I created for Jo (aka Texlady) in our Brats Birthday Card Club.  I love vintage and sewing themes so this was really fun to create for Jo and she really loved getting it!  I used the Cricut "Artist" cartridge from Stampin Up to make the swirly topped tag and label.   Here's some information on how to create your own and a few close-ups I hope you enjoy:
I paired the dark navy blue and gold foil cardstock with the "Damask" sheet from Teresa Collins "Now & Then" paper collection.  I really liked the striking contrast of these papers together.  The Prima flower was sprayed with Gold Foil Bloom Spray, added a bit of Diamond colored Stickles to finish the center, then softened the look with a bit of gold tulle gathered behind the flower.   The sentiment label was simply a 1" version of the same tag cut and it made a perfect background for my "Have a Beautiful Day" sentiment. 
I used Tim Holtz's "Alterations" die to cut the dress form and thread spool.  Decorating the dress form was my favorite part.  I had some Websters Pages navy blue lace that I used as the dress base; added some vintage cream and gold crocheted trim around the neck, waist and bottom.  Then I highlighted the waist with a few little Stickled roses and some gold tulle.  I added another small rose at the neckline and finished the top and bottom of the dress from with some Gold Pearl colored Pearl Drops.  To highlight the dress form, I added a cream doily behind it along with a swirly gold foil die cut, and a pretty floral print I fussy cut from the damask paper.  They layered up nicely with foam tape which give the tag some extra dimension.  
Finely, I finished off the tag side with some vintage lace given to me by my dear friend Martica.  I repeated the dress lace across the bottom, added a vintage spool top and a thread wrapped spool; then finished it off with a handmade stickpin.  
You can find a list of supplies I used to make this tag here:  http://www.scrapbook.com/myplace/index.php?mod=galleries&u=641373&m=view&id=5321411

Well friends that's it for me today.  Thank you for dropping by, your visits are very much appreciated! I hope you enjoyed this pretty vintage tag and encourage you to create something beautiful today!  Until next time, have a joyous day! ~ Dawna

Wednesday, April 27, 2016

Sweet Birthday Card

Hi Friends, Today I'm sharing a pretty, yet quick and easy birthday card.  I created this for my dear friend Susie (aka Scrapsmart).  For papers I chose the "Sweet" page from Kaisercraft "Be-YOU-tiful" collection.  To begin, I cut the yellow background to 5x7 and the aqua card top to 4 1/2" x 6 1/2" to leave a 1/4" frame of each color around the card.   I distressed the edges of both layers then roughly sewed the edges using two different stitches. Then I fussy cut two flowers, shaped and inked them, and added a Kaisercraft "Sparklets" in sea breeze to finish the centers.  I dipped the leaves in a bit of  "Diamond Dust" for added sparkle and made a few Prima wire sprigs for a finishing touch.  
To assemble, I adhered the bottom yellow mat to a basic 5 x7 ivory card, layered on the aqua mat and  curled up the left corner to add a white "Soprano" flower from Prima.  I arranged the rest of the flowers to my liking, popping up the yellow ones for added dimension.  Tucked in the white flowers, leaves, and sprigs around the yellow flowers and there you have it, pretty yet easy and simple!   

Well friends, that's it for me today.  Thank you for dropping by, your visits are always appreciated!    Have a joyous day!  ~ Dawna

Monday, April 18, 2016

Easel Brithday Card

Today I'm sharing an easel birthday card I created for my fried Yvonne.  Easel cards are fun and easy to make and they display so pretty all by themselves!  Here's a few close ups and a bit of information on how to create your own:
An easel is created using two different lengths of cardstock.  Make your front any size you'd like, then make the bottom the same width, but make it at least 2" inches longer than your front.  Score the longer piece at the bottom at 1/2" and again at 2"  Fold your scored lines like an accordion.  Attach the 1/2" area about 1 1/2" up from the bottom of the backside of your card.  Fold the second score line towards the front of your card creating a base.  You'll need to add a stop on the bottom of the card so the front will stand up by itself.  
Thick lace works perfectly as a stop for the top of the card. You can also use buttons, brads, punched cardstock, just about anything that will create a 'lip' to hold the card upright.  
I covered the top, bottom and the unseen areas with green cardstock.  I fussy cut a few flowers, painted them with Glossy Accents and finished the centers with Butter colored Micro Beads from Prima.  I layered a die cut background over contrasting cardstock, and popped up the flowers for extra dimension.  Lastly, I inked the edges with Tim Holtz Distress Ink in Vintage Photo, added a few die cut Prima leaves, added sprigs of curled Prima wire and finished it with a punched butterfly.  

The decorating possibilities are endless with this style card so I hope you get creative and make one of your own!  Thank you so much for dropping by and I wish you a joyous day!  ~ Dawna


Thursday, April 14, 2016

Steampunk Birthday Card


"Happy 18th Birthday Joshua"
Hi Friends,  Today I'm sharing a card I made for my 'adopted grandson' Josh for his 18th birthday. Whenever I create for my grandsons, I always seem to lean towards a "Time Fly's" theme.  Probably because they are all growing up so fast!  It may look a little complicated but actually with just a few simple techniques it was pretty easy and lots of fun to create.   

To start, I used Graphic 45's "Steampunk Spells" paper collection and its coordinating 6x6 cardstock pad.   I fussy cut a few flowers for the cover and inside with their vines or gears still attached.  Then I picked out a nice big hot air balloon for the cover and a small on for the inside.  I really wanted the big balloon to have a lot of dimension, so I adhered it to chipboard, distressed the edges (using TH Vintage Photo) and added a few coats of Glossy Accents to make it shine and really pop!  
Male Steampunk Gear Head Chippy from Gina's Design
Then I took this amazing Steampunk Male Gear Head chippy, a gift from my friend Donna from Gina's Designs and finished it with some Viva Inka Gold and Copper colored Metallic Rubs.  I used the same metallic rubs in green, azure and turquoise to finish the Leaky Shed Spring Butterfly.
Steampunk Male Gear Head Close Up


Putting it all together was pretty simple.  Before I adhered anything or double matted the background papers, I added the corner eyelets to the top piece of cardstock, roughed up the mat edges and distressed them with ink.  Then I roughly sewed the edge of each mat with different stitches.  I arranged the embellishments the way I wanted them, then used a clock face to stamp out a few peek-a-boo clocks and the inside sentiment.  Now I was ready to secure everything down.  I used some foam tape to lift the balloon up, tucked in a few flowers and the gear head, layered on some metal gears, butterfly sequins, and finely the birthday banner.  Here's the inside of the card and a final look at the cover:
"Live the Life You've Imagined"
Happy 18th Birthday Joshua"
Well friends that's it for me today.  I hope all you Steampunk fans out there enjoyed this fun, funky and cool masculine card.  Until next time, I hope you're inspired to create something from the heart!  ~ Dawna

PS:  If you're new to my site, please feel free to join or sign up for emails so you can enjoy what's next!  

Saturday, May 2, 2015

Love, Cherish and Adore

Hi Friends,

Happy National Scrapbook Day!  I hope my scrappy friends are working their paper magic today.  I'm dropping by to share my latest layout of my endearing grandparents John and Vesta Jones.  Last summer I was able to visit my dad and he wanted me to have this lovely picture of them.  Although they didn't live nearby, my parents took me to see them several times when I was a little and the one thing I remember so clearly about them is how sweet they were on one another.  I think this photo captures their love for each other perfectly! 
Their sweet smiles ooze happiness to me and I can imagine grandma leaning her head back oh so slightly for a little cuddle against grandpa's shoulder.  They are so sweet together, I wanted their photo to take center stage on this vintage inspired layout.  To do that, I kept the design fairly simple but played up a few simple techniques to create loads of great dimension.   

I started by cutting a this lovely photo frame and shadow from my Cricut using the CTMH Artiste cartridge.  I placed it center stage and layered it up with cardboard so I would have plenty of room to tuck goodies here and there to give the layout a sense of  balance.  Then I sewed around the bottom layer using black to give it a subtle pop of contrast:  
I used the same layering technique to lift the double punched corners, printed flowers and balloon.  This simple step adds so much depth to your layout, I just love the added dimension.  
To increase the vintage appeal I tucked some beautiful cream colored Venice lace just along the bottom of the frame.  This also helped to soften the bold color of the coral hand rolled tattered roses.  See how nicely the added dimension lets you layer in the flowers and leaves tucked here and their around the ornate frame. 
I finished off the layout by adding my chipboard titles "Love, Cherish & Adore."  I finished them with Pearl Drops in Avocado color and added a layer of glossy accents to give them some shine.   And finely I added stickles to the leaves (using eucalyptus), flower centers and rolled rose edges (using fruit punch), and white roses (using diamond) for some pretty sparkle. 
Well friends that's it for me today.  I want to thank you for dropping by and I hope you take the time to celebrate National Scrapbooking Day by creating something from your heart!  Hugs ~ Dawna


Friday, April 3, 2015

Romantic Parisian Inspired Envelope Mini Album

Morning Friends,


Today I'm sharing this pretty vintage style envelope mini album I created for my dear friend Susie (aka Scrap Smart) in a swap being hosted by Ilovepapillons at sb.com.  Susie loves all things vintage and feminine so I decided to use a mix of two of my favorite paper collections (Prima's Romance Novel and Marion Smith's Garment District) to make her this romantic vintage style, Parisian inspired envelope mini album.  
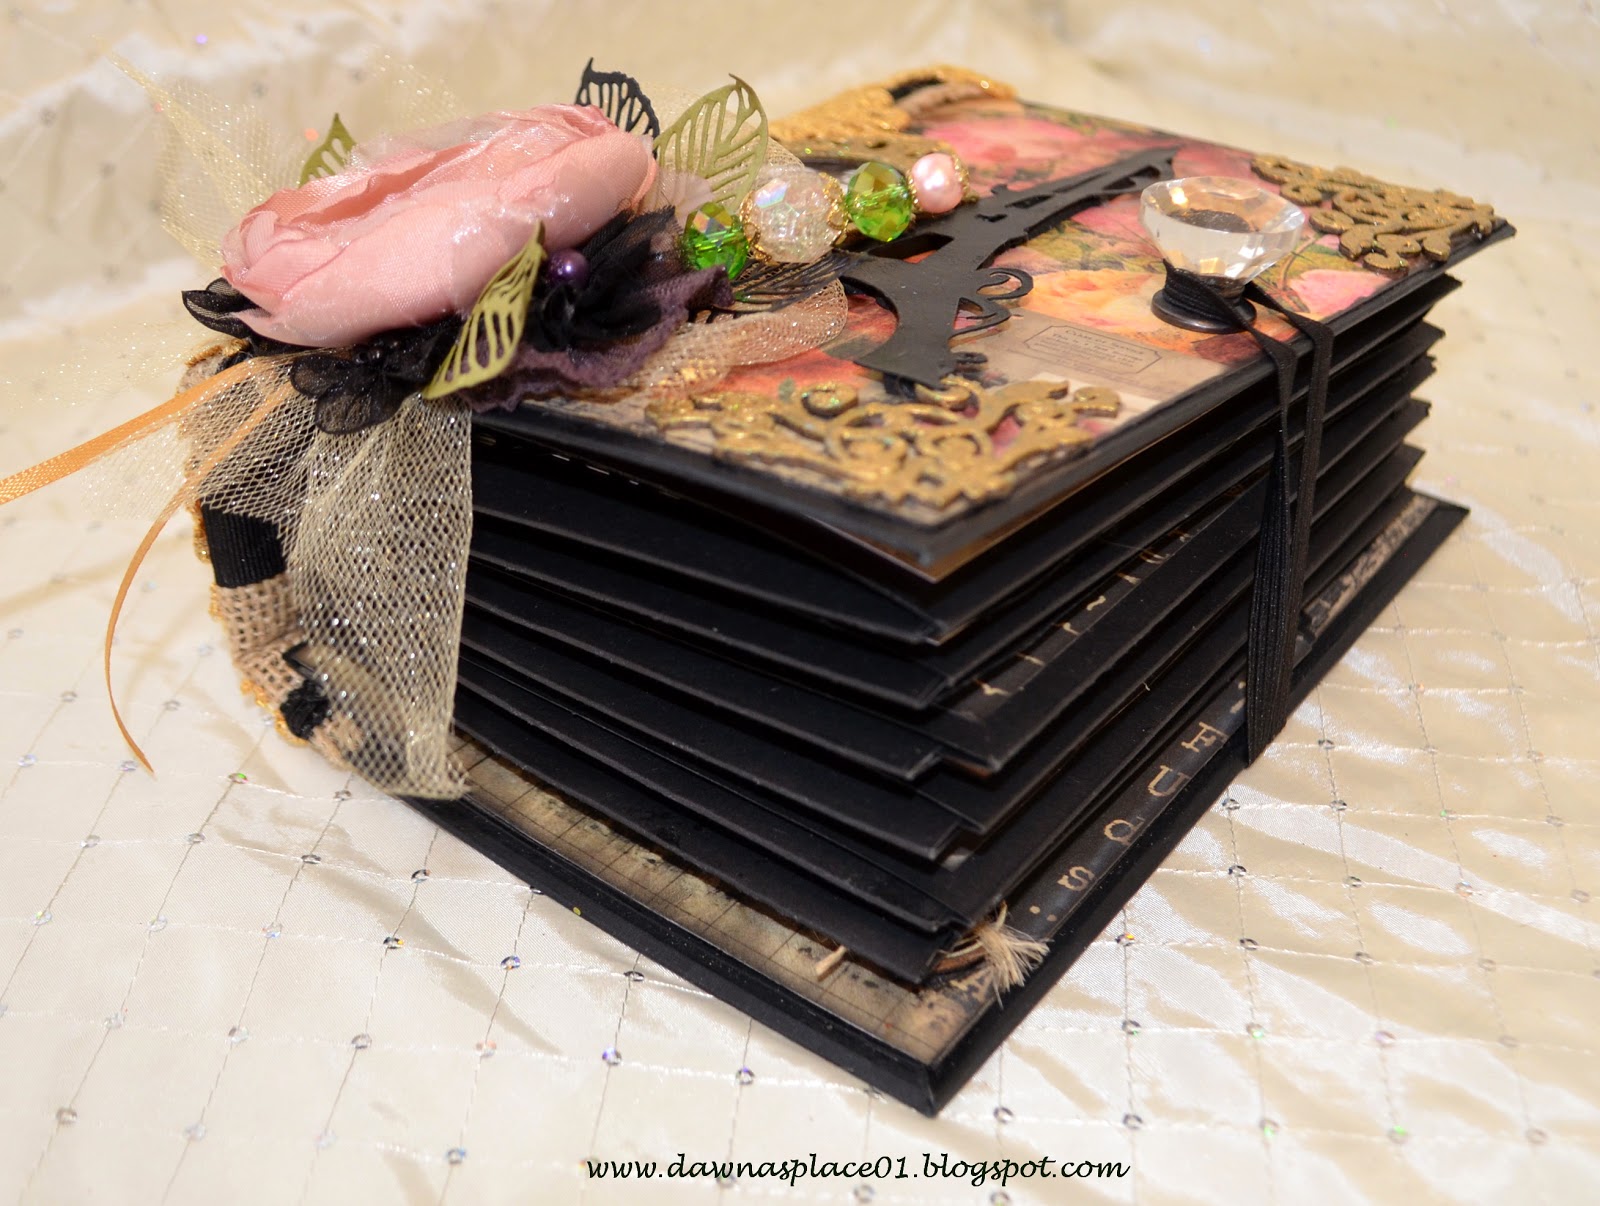
Side view of envelopes and cards assembled
The album cover measures 8x6 with a 3 inch spine.  The envelope pages were created using 6 each standard A7 black envelopes.   And the photo wallets with photo waterfalls were created from the A7 cards.  Once assembled there is enough room for 54 matted photos, and 23 journaling tags.  That's plenty of room for Susie to document whatever her heart desires!  
Finished Envelope Pages with File Folder Photo Wallet Cards
To create the envelope pages, the envelope flaps were sealed closed first.  Then all four sides were trimmed down by 1/8." The front and back of the envelopes were covered with distressed paper leaving a 1/4" frame.  Then I closed up the top and bottom of each envelope by scoring a 3" wide strip cardstock in half, punching it with a Martha Stewart daisy edge punch.  I burnished the fold then sandwiched the open envelope ends back together by gluing the daisy strips to the outside of the envelopes to close them back up.  This allowed the photo wallets to fit snugly into their envelopes without any slop.  The punched  bottom boarders double as stops for the journaling tags and the decorated burlap belly bands hold the tags safely in place.   Finely, the remaining open envelope bottoms were secured with score tape over the spines hidden hinge binding system.    The only opening left is the outside for holding the photo card wallets in place. 
  Envelope Pages Sandwiched Back Together with Daisy Punch Strips
The photo wallets were created from the A7 cards.  I used the We Are Memory Keepers Envelope Punch Board tool to create two sets of three staggered file folder tabs for words.  I left the left side of the cards straight so they fit flat and evenly inside their envelopes against the hidden hinge. 
Outside File Folders with Word Tabs
Inside File Folders with 3 Tier Photo Waterfalls
Photo Card Wallet out of its Envelope
I covered the left inside of the cards, front and back outsides with distressed paper leaving a 1/4" frame (see above).  The right inside of the photo card wallet features the 3 tier photo waterfall (also, see above). 
File Folder Tabs Facing Spine
When the cards are in their envelopes, the tabs face towards the spine (see above) to prevent the tabs from getting tattered by the elastic loop closure or by repeated use (see below).  
Elastic Loop Closure
Now that you have a good idea of how the album was created, lets look through its lovely pages:
Page 1 Folded Out
Page 2 Folded Out
Page 3 Folded Out
Page 4 Folded Out
Page 5 Folded Out
Page 6 Folded Out
Inside of the Back Cover
The inside back cover has a large deep pocket which has been popped up with foam tape to create enough depth to hide the metal tip of the elastic closure loop.  The outside of the back cover is sweet and simple:
Back Cover
Now lets have a closer look at the front cover:
Front Cover
The front cover features a sweet picture of Susie and her dear husband in the foreground of the Eiffel Tower.  The wooden frame and chipboard corners were embossed with gold to go with the gold lace covering the album spine.  A pretty crystal knob and elastic loop act as a closure to keep everything nice and neat,    The cover was embellished by layering a vintage Prima flower, with Prima's filigree leaves, a few black Prima bumper flowers, a gold tulle bow, gold ribbon, and a handmade stickpin.    
Finished Spine
The spine is decorated by layering it with burlap, black ribbon and has a back to back layer of gold Venice lace.  As a final touch, a chunky brass charm adorns the spine with Parisian and vintage inspired tassels, chains and trinkets.  
Chunky Charm Close Up
Well friends that's it for me today.  Wishing you all a wonderful Good Friday!  Until next time, create something beautiful from your heart and choose to live your  life inspired!  Big Hugs ~ Dawna